Today starts week 2 of the Regency Regimen experiment and we figured we’d recap week 1 for you guys and share everything we’ve learned so far through doing this experiment.
So far I will say the biggest thing I’ve learned is I just don’t have the amount of down time to take 3 mile walks daily followed by all of the skin brushing and sponge bathing. My lifestyle isn’t necessarily crazy busy but not having a staff to take care of things like housework, meals, and educating the children I just don’t have the time for it all by myself. This type of schedule is much more suited to a lady of leisure and I’m sadly not a woman of leisure.
I struggle with getting to bed before 10pm. At first it was really easy, I was exhausted coming down from two weeks straight of events and welcomed the idea of getting to bed on time, but after a few days I began to struggle with it. I enjoy having a few hours of me time after the kids go to bed which usually results in me staying up closer to 11pm or midnight. After years of this being my schedule I think I’m just naturally a night owl now. Even when forcing myself into bed by 10pm I don’t find myself getting any more restful sleep than normal.
Broth before bedtime is weird. It’s comforting and I guess it works like a glass of warm milk before bed. I can’t vouch for its effectiveness but I guess at least I’m getting a good dose of vitamins and minerals every night.
I’m not actually in the best shape and should probably stretch more. There once was a time where I ran track and danced and was generally active. That was many, many years ago. I am definitely not that person anymore. After three kids, some injuries, and major body changes I’m just not as limber or fast as I used to be. I try to remind myself while walking that these Regency ladies weren’t sprinting for 3 miles, they were leisurely strolling, admiring the flowers and countryside. It wasn’t a race, it was more about actually being active.
Ive been using hair powder to brush my body after walks and now my skin is weirdly soft. I’ll be sharing a recipe this coming week on how to make your own friction oil from an 1825 guide using neatsfoot oil, alkanet root, and palm oil.
I like butter and spices. A lot. I have a really hard time shying away from the butter and I’m a sucker for curries and spices at dinner time which combined were thought to cause bilious disorders and were big no-no’s. Seeing as I have no gallbladder and already have liver and pancreas problems I’m probably the last person to ask if bilious issues are caused by spices and curries. Spicy foods can irritate an already cranky gallbladder, which stores and releases bile, and fats like butter are also no good for inflamed or diseased gallbladders so they were kind of on to something. They also recognized that waiting too long between meals wasn’t great for digestion and suggested taking small meals throughout the day, something we now know to be best practice.
So far it seems like they had some pretty decent thoughts on health even if the whys and hows weren’t exactly correct. I’m excited to see what next week brings.
During our research for our “An Accomplished Lady” workshop taught at the Jane Austen Festival in Louisville, KY we came across a number of etiquette and beauty handbooks created for ladies of good breeding. Whilst reading through them we giggled over some of the recipes for removing freckles and made mental notes of which colors worked best for which complexions. Of notable things learned was the use of the term majestic when referring to shape and size, meant large and when referring to age, meant a woman over 30, according to the Mirror of Graces, 1811.
One thing each of these books included, which must have been a pretty important topic for ladies, were detailed schedules of how much sleep and exercise a lady should be receiving in order to maintain her natural beauty. Some of these even went as far as to recommend a specific diet be followed which was thought to effect the health, and therefore, the complexion and charms of a lady.
We thought what better way to experience the life of an accomplished lady of the Regency/Federal era than to try our hand at following the prescribed beauty regimen of the time and of course document it for you!
So based on the various handbooks we have read, the following regimen and accompanying diet will be followed for 8 weeks. We will track our mileage using the Map My Walk app and will have weekly check ins through our Instagram stories. The challenge will begin on September 3rd and run through October 29th. We have each made a list of our concessions based on our current obligations and modern lifestyles that cannot be avoid. For the final day of our challenge we will showcase all we have learned through our studies of etiquette and the era by demonstrating the lifestyle of the ladies of the upper middle class in Federal era America at a local historical site, complete with some live streams and videos.
Brittany’s Regency Beauty Regimen
I will walk 1 mile to and from school each morning on weekdays to drop off my son.
After my walk I will take a cold sponge bath and use friction oil to stimulate the body
For breakfast I will have a cup of coffee or tea, bread with preserves and bacon or sausage
For my afternoon exercise I will walk 1 mile to and from school on weekdays to pick up my son.
On weekends I will walk 2 miles each day on the Meadow Loop Trail at Forest Nature Preserve.
I will go to bed before 10pm each night, allowing myself four nights a month to stay up for pleasure.
If I do not make it to bed before 10pm I will take a 1 hour nap in the afternoon the next day.
Before bed I will take a hot bath and drink 1 cup of warm broth.
Brittany’s Concessions
If weather is poor I may elect to drive and makeup the mileage later that day at the gym or on another day altogether.
I will dress in normal, modern clothes throughout the experiment with the exception being the final day.
I will eat a diet as consist with that which is recommended but may make substitutions for health when needed.
Hayley’s Regency Beauty Regimen
I will walk one mile each day to the local coffee shop.
After my walking I will use a soft cotton cloth to rub the body in lieu of the friction oil.
I will eat an approved breakfast and lunch consisting of coffee and tea, bread, oatmeal and other relatively bland foods.
I will be in bed by 10 pm, but may not be asleep until later.
Hayley’s Concessions
I will only be practicing this Monday through Friday.
Dinners will not follow the recommendations but will be whatever I manage to eat.
I will not be walking if the weather is inclement and will make it up with vigorous activity at dance classes instead.
I will not be taking morning or evening walks in the dark for safety reasons therefore will adjust the recommended schedule to work better with the changing seasons.
Throughout the experiment we will update the blog periodically sharing research relevant to the experiment including recipes for making your own friction oil and discussing the science behind some of this.
I had begun planning my evening wear for the Jane Austen Ball at the beautiful Pendennis Club well before I even had my tickets purchased. Cart before horse? Maybe just a bit, but as soon as I found out that it was a masquerade ball my choice in fabrics and the fashion plate inspo somehow worked magically together to become the perfect base for a Greek Goddess costume! Yay, because really how often does that happen?
After a refresher in Greek Mythology I settled on Demeter since I had a pretty green dupatta to use as the overdress and it really worked for the whole fertility and agriculture thing she was known for. Obviously I needed some sort of pretty diadem, wreath, hair piece thing to play up the whole Greek Goddess thing so I began searching for some inspo on Pinterest and Etsy. I didn’t want to do just a plain gold laurel wreath — I needed something with some real wow factor. That’s when I found some awesome images of her in ancient art, and even a few early 18th century pieces, wearing a crown with wheat and poppies — both symbols that she was associated with, again the whole harvest thing.
I dug around on Etsy determined to find some things to put together my own bejeweled crown of wheat. I started with a base of golden leaves which I wired and wrapped on a gold plated headband. Next I found some sprays of wheat made from beautiful glass beads — plain clear beads and then multi-color browns just like actual wheat. I added them to the crown along with some sprays of wired pearls in various sizes. The last piece to find were bejeweled poppies. I scoured, and I mean scoured, the internet but could not find a thing, at least a thing that fell within my price range for this project. I resorted to making my own — because why not? I’m already DIYing an entire tiara thingy whats a few extra pieces. I found some sprays of red paste stones and when wrapped around an onyx bead that had been wired to a stem they looked perfect. Finally Demeter had a headdress fit for a Goddess.
I did an impromptu photo shoot at the edge of the beautiful wheat field behind our house, just in the nick of time since they took in the field just the very next day. After seeing it all put together I couldn’t wait to show it off at the ball.
Obviously when it came time for the ball I couldn’t resist taking a bajillion pictures, especially with the beautiful columns.
For day two of the Jane Austen Festival I obviously had to make another thing — its a problem, I know. Hayley had fairly quickly decided upon an Incroyable look based on this print and an extant spencer.
I flipped through fashion plates for inspiration and eventually settled on a Merveilleus inspired look with a white petticoat and some kind of spencer on top. I started out with a self drafted spencer pattern made from a pretty chartreuse silk “harvested” from an old silk top that just never quite looked right on me. I piped the back diamond shape with some fuchsia silk and worked towards some adorable globe sleeves with contrasting bands of fuchsia. I got as far as putting one sleeve one when I kind of just fell out of love with the look — the sleeves, man they aren’t doing it for me.
So now with minimal time to shop, plan, and construct something to go on top of the white petticoat I searched Pinterest for some inspo. I loved the looks of white gowns with short hemlines and all of the ruffles! Ruffles on ruffles and delicate, feminine looks just seemed the perfect contrast to Hayley’s more masculine look. I dug in my stash to retrieve a blue crossbar fabric perfect a simple, close fitting spencer bodice. I used a pattern taken from an extant in the Nordiska Museet and then altered the fun sleeves on the Laughing Moon pattern #129 to fit tightly around my arms.
I topped the look off by recovering and trimming my Timely Tresses bonnet to mimic a delicate percale bonnet using the leftover pleated gauze from my Mary Shelley ensemble — I have plans to attempt an actual drawn percale bonnet this winter. I trimmed it with some vintage figured rayon ribbon and a big ole flower and called it a look.
Hayley’s look consisted of a highly tailored spencer jacket with a standing collar and lapels, mimicking a man’s jacket. When paired with her fun black and white striped cotton voile gown, ruffed chemisette and a bold green silk printed cravat from Virginia Scarves the Incroyable look was really beginning to take shape. The piece de resistance was her beautiful custom fur felt top hat trimmed with a black silk band and black ostrich feathers and green pheasant feathers. Can you say incredible?
When someone mentions Regency fashion one typically envisions pretty and demure young ladies flitting about in sheer white gowns tied neatly with pastel colored sashes ala your grandma’s nightgown. However, when I think of Regency fashion my mind immediately wanders to the unusual, the ridiculous, and the under represented, especially when I have the freedom of not having to actually represent anyone at all, just simply to make a thing.
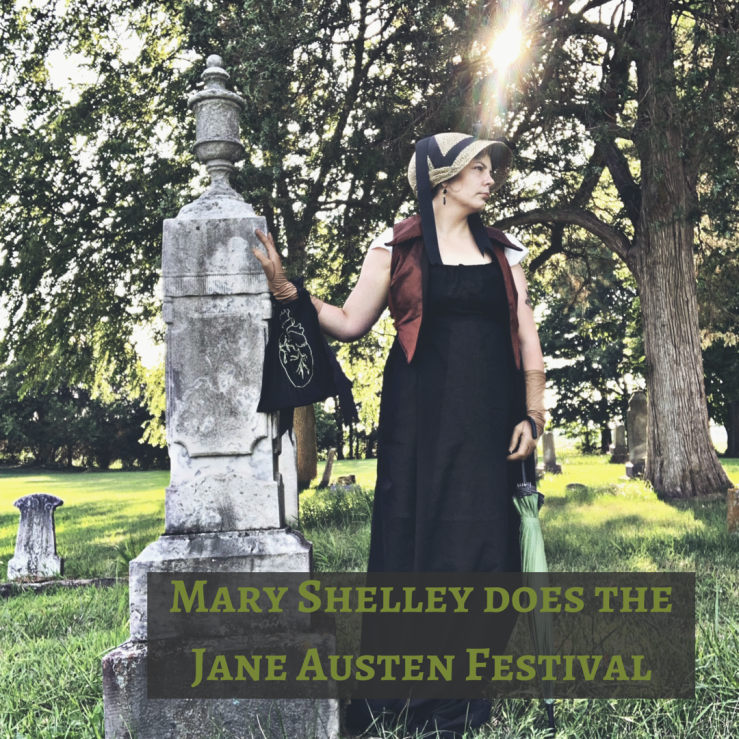
Enter my Mary Shelley inspired ensemble for Friday evening at the Jane Austen Festival in Louisville, KY. I honestly don’t remember how it became the Mary Shelley gown, having its humble roots in a super cool fashion plate depicting a woman in a black bodiced petticoat with these weird sleeves and gorgeous long gloves.
I chose a pretty black cotton muslin for the bodiced petticoat and using the Laughing Moon pattern #126 I quickly whipped it together. I was then tasked with figuring out what the heck those weird sleeves were all about.
With no visible canezou or chemisette* to be in possession of the sleeves it had to be one of two things: sleeves added on to the bodiced petticoat itself or pleated shift sleeves like these seen on an extant in the V&A Museum. Not being entirely certain what they were I attempted to mimic the pleated sleeve look with a pair of pleated gauze sleeves which I tacked onto my short shift sleeves.
I next turned to making a reticule. Now, anyone who knows me knows I am not a fan of the tiny little reticules often seen dangling daintily at the wrists of others. I like big purses in real life and big bags in my historical costuming. I started with a scrap of cotton muslin leftover from the petticoat and with its 9″ by 7″ measurements it was just the perfect size to carry my fan, phone, wallet, meds, gloves, and even a little bottle of water if needed — perfect for JAF. Only problem was a plain black bag was decidedly boring compared to the many examples in museums. I jazzed it up with some embroidery (an anatomical correct human heart in green silk) and voila it was now a Gothic Mary Shelley inspired look!
To top off the ensemble I retrimmed my straw capote from Virgil’s Fine Goods with some black grosgrain ribbon and added a beautiful antique veil for a fun touch – because bonnet veils are awesome but also help keep annoying bugs from your face.
Unfortunately I didn’t get a single picture of me in this costume at the actual festival, but I did manage to do a mini photo shoot prior to the event — and afterwards promptly shortened the hem and added the pleated sleeves and bonnet veil.
*Upon closer inspection and adjustment of the screen setting you can faintly make out a high neckline of a sheer chemisette under the black petticoat, which is the most likely explanation for where the sleeves are coming from.
It wasn’t enough for me to just recreate the gown Barbara Johnson could have made with her red and white chintz fabric sometime in 1781. I really wanted to bring her to life through this project. Adding the all white accessories was simple enough, but it was only a piece of the puzzle and still didn’t give us the whole picture of who Barbara Johnson was.
As I began to work on cutting the apron and handkerchief and hemming the miles, and miles, of ruffles for both I began to think about what else Barbara might have worn with this gown. That’s when Kim Walters of At the Sign of the Gray Horse and I began talking about jewelry and watches. You see in real life I am not a jewelry person at all, the only thing I ever really wear is my wedding band, and at events it’s usually even more difficult for me to work jewelry into the equation. I pretty much go sans jewelry except maybe a simple coral necklace or drop earrings every once in awhile, they’re safe pieces and easy to spot in portraits, everything else I just don’t know enough about to feel comfortable donning.
I started chatting with Kim and immediately knew that I needed at least earrings. The fluff from the full ruffled handkerchief would obscure a necklace so it seemed silly to even be wearing one. I brought up earrings and she immediately suggested elongated drop pearls, which I just so happened to have on my wish list. Through her study of portraits and prints she has been able to kind of narrow down the trends through the decades. She says, “That doesn’t mean they didn’t wear other things – we just aren’t seeing it in portraits…” Pearls just happened to be a classic that remained popular through the centuries.
1778 fashion plate from Gallerie des Modes
Once the earrings were settled she brought up my poor watch-less watch strings and suggested her reproduction gold case pocket watch. It would perfectly complement the gold in the pearl earrings and right around the 1780s we begin to see watch strings and watches become commonplace in fashion plates and portraits.
1778 fashion plate from Gallerie des Modes
Journal des Luxus und der Moden, Tafel 11, April 1788.
Earrings – Check! Watch – Check! I think all that was needed to round out the work was a pretty little portrait miniature of one of my historical boyfriends. Having based my persona partly on the Blennerhasset family which settled in southern Ohio at the end of the 18th century I thought it would only be fitting to have my beau Harman Blennerhasset’s portrait miniature recreated.
Our workshop aims to round out the immersive experience of the Jane Austen Festival by teaching participants how to navigate polite society by making introductions and good acquaintances, demonstrating the skills and abilities needed to be considered accomplished without looking like Mary Bennet, knowing the in’s and out’s of this social hierarchy, and why all of this craziness was crucial to the success and livelihood of many unmarried women in want of a single man in possession of a good fortune. Each workshop will run for one hour and thirty minutes and both will cover the exact same material and include the same experience regardless if you choose workshop Part I or Part II.
What You’ll Learn
Dukes, Earls, and Esq.: Social Hierarchy during the Regency Era – A look at the
social hierarchy of Regency era England. We will look at what exactly makes a gentleman a gentleman, how this hierarchy could effect your future, and the differences between the Gentry class and the Peerage.
Match Making for Success – How you could better your social standing by marriage, why money wasn’t everything, and why finishing schools became a popular tool for the daughters of the newly emerging middle class.
Coming Out in Society – A primer on all things proper concerning introductions, from how to introduce oneself and be presented to others, to how to properly use titles and show deference in curtsies.
Making Conversation – An exercise in polite conversations, including topics to discuss and topics to avoid, popular opinions of the time, and how to remain respectful and deferential during conversation.
An Accomplished Lady – An overview of the various skills attributed to accomplished young ladies of the time and a series of exercises to practice three of these skills.
What You’ll Get
Each participant will receive the aforementioned knowledge through an interactive lecture (read: Not Boring!)
The opportunity to make their own calling cards, necessary for making all of those important acquaintances.
A letter of introduction to the fine ladies of Spring Grove Cottage, securing you an invitation to their parlor for refreshments, cards, and agreeable conversation.
The opportunity to practice the accomplishments of art through sketching and watercolors, botany, and poetry in the creation of a ‘friendship journal’ based on several extants from the Regency era (check one out here!)- the perfect memento for your experience at the Jane Austen Festival!
Meet the Landrum Ladies
Esther Catherine Landrum was born in Chelthenham, her father the proprietor of the George Inn a well established coaching inn on the road to Bath. Coming from a genteel family she was sent to school in Bristol as a young girl where she became known as an accomplished singer and pianist. She returned home at the age of 17 after the unexpected death of her father. It was then that she begin to receive pressure from her older brother to find a suitor and settle down. After many unsuccessful attempts to marry her off he finally resigned to the fact that as long as the inn was prosperous she would not be a burden.
Lydia Maria Aldridge Landrum was born in Bristol to a family with no particular fortune and only their name to recommend them. Her father inherited their meager estate and a pittance which allowed them to live in some comfort. Her aunt took pity on their family and agreed to pay for her schooling in Bristol as they could not afford the tuition for both her and her older brother. Upon returning from school she soon made the acquaintance of Thomas Landrum, a schoolmates brother and young officer in the Army. They were wed and soon she was moved to her new home in Chelthenham.
In 1812 the news came of Thomas Landrum’s death and the Landrum ladies were left with an uncertain future. Advised by their lawyer, and close family friend, the ladies agreed to sell the George Inn to Mr. E. Hughes in 1813. They received a substantial sum for the bustling inn and moved to Bristol where they later opened the Landrum Ladies Academy to teach young girls in the town and pad their modest income.
If you follow us on Instagram then you’ve probably seen us talk about the app and website called Airtable. If you haven’t, Airtable is basically a spreadsheet that also works as a database, so not only can you input information into an easy to read platform, you can organize it in a bazillion different ways to make it work for you! I’m low key obsessed, ok maybe not so low key lol.
I was first introduced to Airtable last summer when working with Molly Cooper of the 1st WAC Separate BN, she’s the queen of organization! It wasn’t love at first sight, but I did see the usefulness of the program at the time. I started setting up my first database to help me plan out projects and stay on top of them – something my UFO pile would love me to do. I planned about three projects and then forgot about it. Between the holidays and the general feelings of meh after The Season I kind of just wasn’t feeling it and the Airtable app just wasn’t working for me with the magic and wonder that Molly insisted it had for her.
Fast forward to this January, I had a slew of projects lined up in my head in multiple time periods. Add on to that the normal day to day things I have to remember between keeping the children alive, schooled, and the house from catching on fire. I was mentally fried and project pieces and deadlines were beginning to slip through the cracks. Thanks mom brain. I decided to sit down and force myself to make this Airtable app work the way I wanted it to.
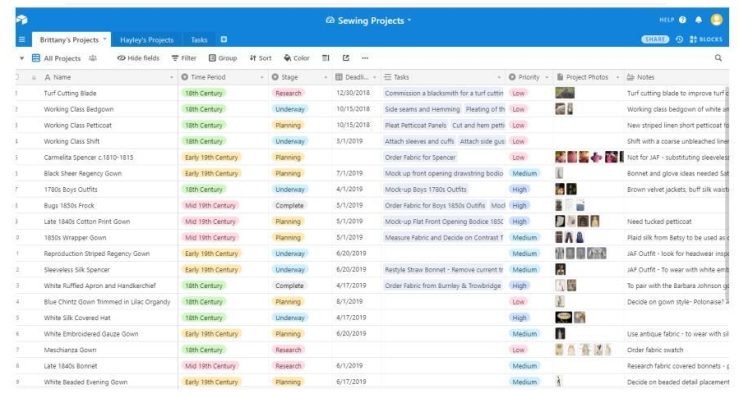
First I decided I needed a database just for my sewing projects, something where I could easily see all of my planned projects, which time period they were for, which stage they were in, and what their deadline and priority level was. I started using the “Simple Project Tracker” database template in the app and then began customizing the fields.
Simple Project Tracker templateThe modified template for my sewing projects
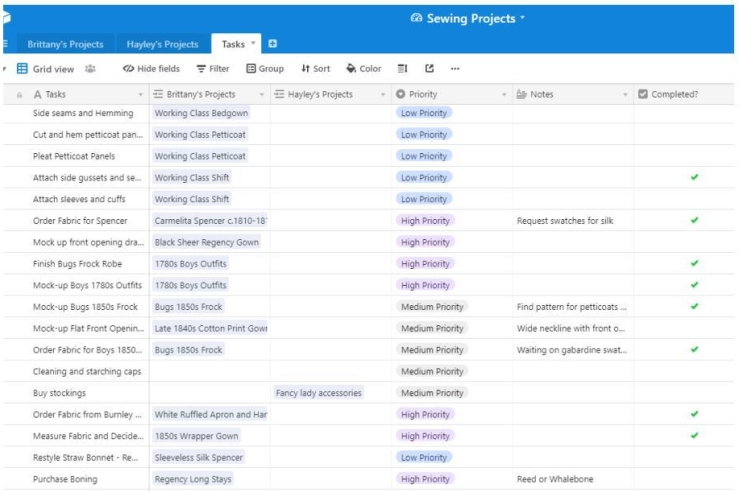
I left the first column (name) the same, copied the ‘Stage’ column and used it to create the ‘Time Period’ column, changing the options to 18th century, early 19th century, mid 19th century, and WWII. I kept the ‘Deadline’, ‘Priority’, ‘Photos’, and ‘Notes’ sections the same, just shuffled them a bit more to my liking. I also kept the ‘Tasks’ column which is a neat little way to connect to another spreadsheet all within the same database. Above you can see what the database looked like as the Simple Project Tracker template and what mine looks like now. Since Hayley and I use the same database for all of our reenacting stuff I copied my customized spreadsheet and just updated the name to differentiate between them, it now sits as the second tab in the Sewing Projects database with the Tasks spreadsheet as the third tab. The ‘Tasks’ spreadsheet is linked to both of the individual tables for our projects. As we enter tasks into our entries they generate here in the table. Below you can see what the ‘Tasks’ spreadsheet looks like, I only changed a couple of things on this spreadsheet.
The ‘Tasks’ spreadsheet
I love that I can easily track each stage of my projects – no more forgetting to order swatches for weeks at a time. I also love the option of being able to attach photos or other media which is great for tracking inspiration for costumes. I’ve also found that there’s something superbly satisfying about getting to check off a box while in the midst of a project. Things like gowns and jackets and kids clothes (basically anything that isn’t a cap) seem to take forever and I’m definitely an instant gratification kind of person.
Striped gown inspiration
Carmelita inspiration
Ahhh so satisfying!
Now the next database was even more fun to create! I started with the Camping Trip Planner template and quickly started to customize the fields in the first spreadsheet. You can see below how much I changed things! We wanted to use this database as an easy way to organize the events we were attending and keep track of what exactly we were doing at said events since we tend to switch things up a lot. We kept the first column the same but then added a ‘Date’, ‘Prior Attendance, and ‘Registration’ field. I handle all of the administrative stuff so not overbooking us, ensuring we’re registered before deadlines, and have a general idea of what the event is about is something is something that can make my life easier. The next fields handle ‘Interpretation’, ‘Persona’, ‘Research’, and ‘Gear Needed’. The ‘Gear Needed’ field links to the existing ‘Packing List’ spreadsheet which currently needs some work. The ‘Persona’ field is linked to another spreadsheet that details all of those important things you need to keep straight when you do first person interpretation. The ‘Research’ field utilized the existing ‘Link’ field and is where we attach any research or resources related to the event and our interpretation.
Camping Trip Planning templateNewly customized and ready to go!
Ok so the last little bit I’m going to show you is a detail of the Clothing and Accessories spreadsheet. I kind of figured the Persona and Gear and Kit spreadsheets you could figure out on your own or eliminate entirely, but this one is neat. So I struggle with wanting to make a new outfit for every event. It’s just my thing and it needs to stop. I also struggle with remembering what all I have tucked away in storage, out of sight out of mind. So the weeks leading up to an event I inevitably forget what all I own and try to crank something out – enter this spreadsheet! This one tracks all of my outfits and the interchangeable pieces, like petticoats and caps, and all of those fun accessories. I can even go in and link an outfit to a persona so no more scrambling trying to remember if my cotton print gown is appropriate for a particular date/event or social class because its all right there! I can even electronically “pack” my clothing for an event by linking it right to the event spreadsheet! Voila! When I have 1000 other things to remember this one is going to save me from a mental breakdown and keep me in good graces with my hubby if I’m not buying fabric and sewing into the wee hours before an event. Below is an example of my fabulous table which is desperately in need of being updated – I meant to do it when I put all of my stuff away but you know, forgot.
So there you have it folks! This is just an overview of what I’ve done with the Airtable app and how it works for me. As a note all of the images are views from the Airtable website whereas the mobile app has a slightly different layout. If you want more pictures or details on how I set up the other spreadsheets just let me know and I’d be glad to help! I hope this inspires you to get organized and take control of that UFO pile – or at least organize it a little lol.
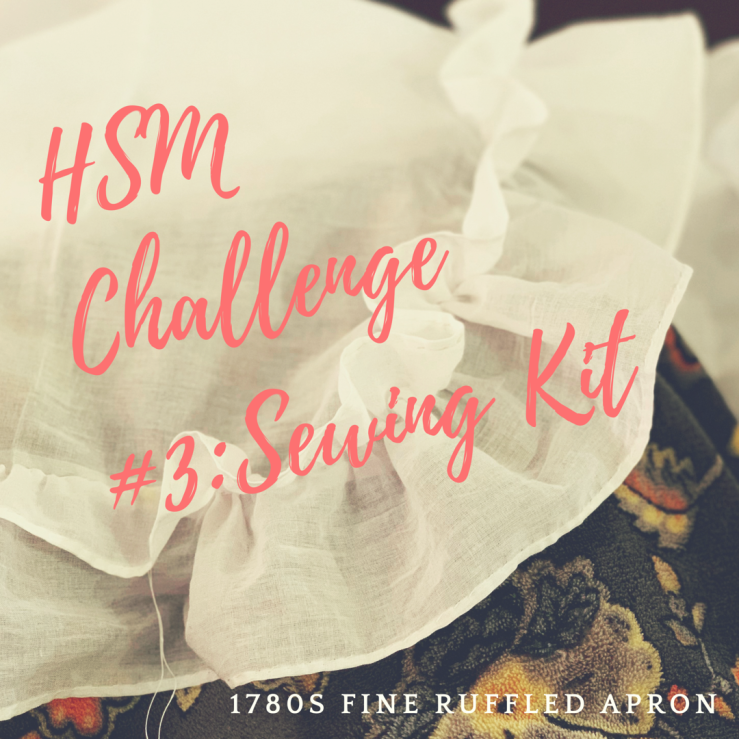
I feel like I’m cheating with March’s challenge of “Sewing Kit” but honestly my sewing kit is a bit sparse so there weren’t many tools to choose from. The challenge calls for you to make something with your favorite tool or gadget from your sewing kit or make something for your historical sewing kit, like a housewife or pinball. Since I have my historical sewing kit in order already, I turned to my favorite tool: the Bohin needle, a French company in business since 1833 and manufacturing needles since 1860. In this day and age it can be difficult to find sewing tools and notions that are produced by manufacturers that are focused on quality and not quantity and cheap labor. I love these needles, they glide like through fabric like butter; yes even that tough K&P wool doesn’t stand a chance with these and I gladly pay to have these little fellows shipped to my door from Burnley & Trowbridge.
For this challenge I am entering my Barbara Johnson fine white muslin apron which was all completed by hand, using period techniques, and my favorite french needles. This post will be short and sweet since I’ve already detailed the project in this post here, so let’s get down to business.
Pattern: None, self drafted based partly on the American Duchess Guide to Sewing
Year: 1780s
Notions: Thread and beeswax
How historically accurate is it? Nothing will ever be 100% accurate so let’s put this at a close 95% accurate.
Hours to complete: Honestly not as long as I thought, I didn’t keep track very well because I was sick but realistically maybe 6-8 hours.
First worn: Hasn’t been worn yet but fingers crossed we’ll have a photo shoot in a couple of weeks. If the weather doesn’t cooperate then it will make its debut at the Crabill Homestead event the last weekend of April.
Total cost: About $36 in fabric between the apron and the handkerchief
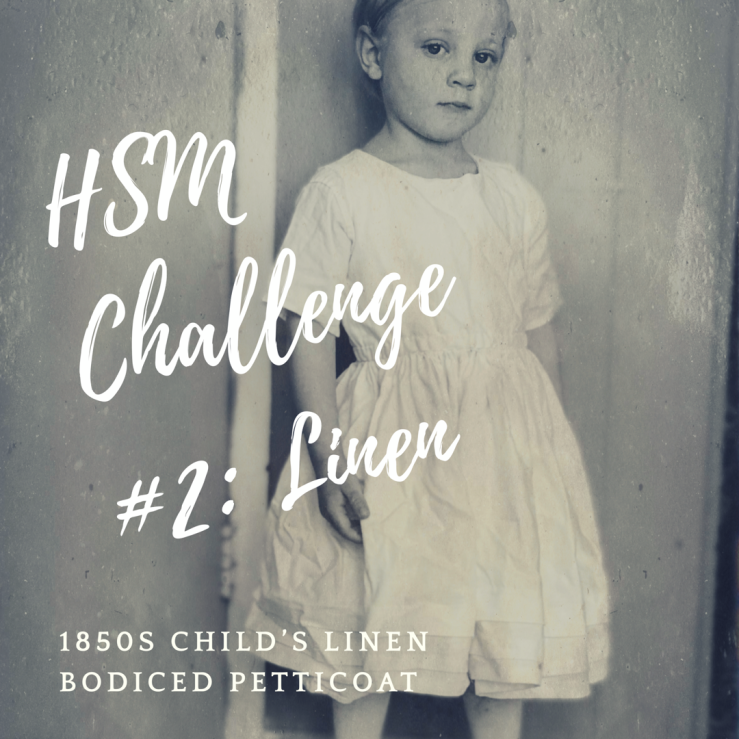
I’m a horrible blogger. I repeat, I am a horrible blogger. As you can tell from the title this post is all about the February HSM challenge, I actually did complete this in February, I just suck at blogging – in case those in the back didn’t hear me the first time. February’s HSM challenge was “Linen/Linens” as in make something out of linen or as in the other use of the word, underclothes. After the 1850 Winter Evening event at Cobblestone Farm, for which I made the last HSM challenge, I had already fallen in love with this new time period and volunteered my children to come with me for the next event at this beautiful site, the Spring Fling to be held on Sunday May 5th. This meant not only would I need another dress suitable for the warm weather, but my three boys would all need full outfits. GULP. That’s a lot of sewing! I’m probably crazy.
I started researching little boys clothes for the 1850s knowing that my youngest (just turned 4 at the end of February) would still be in frocks I decided to start there as information and patterns seemed readily available and easy enough to understand. I dug into Pinterest to look at extant frocks in museums and darling little boys in daguerreotypes (pro tip: center parted hair indicates a girl, side part a boy) and read as much as I could from amazing sites like Elizabeth Stewart Clark’s The Sewing Academy and the blog by Romantic History. I settled on the pattern the Elizabeth puts out, seeing as it seemed the most well researched and with a lot of bang for your buck in terms of everything you could produce with it.
Knowing that every time period requires the use of proper undergarments in order to achieve the look you want, I began drafting up a bodiced petticoat for my little Bug. To be honest this was one of the easiest little garments to make…ever. I measured the munchkin and using the bodice pattern I cut straight into my white linen, no time for mock-ups it’s a simple garment who has time for that lol. Once the bodice was sewn up and was semi-wearable I fitted on the Bug and realized hes actually a lot tinier than said bodice. Facepalm. Not wanting to make another and realizing eventually he will grow I made two vertical tucks at the center back closure of the bodice to take in the extra – when he outgrows it simply remove the tucks!
With the crisis averted I moved onto the skirts. I did some crazy maths and calculated how long the skirts should be and how many panels I wanted. I began sewing them up, hemming and working on the two tucks I had accounted for. I hastily gauged the skirts – no dread and terror this time- and was proud to have finished the petticoat in less than a day. I tricked my little guy into putting it on and SURPRISE I did the math wrong and his skirt was longer than I wanted. GRR.
Too long, oops!
Much better!
So now I had to fudge another set of tucks while the skirt was attached to the bodice, what a pain. I managed to finagle it more quickly than I was expecting and decided to give everything a nice pressing – seriously is there anything more satisfying than freshly pressed tucks on a petticoat? **Note that the following images do not depict a satisfyingly pressed tucked petticoat**
With how quickly I put this together I immediately cut out a sweet frock for him and had it finished in another day. Seriously, this thing is darling. I decided to go with a lightweight cotton plaid/check because 1. it was on clearance 2. it’s always dreadfully hot during the summer events and 3. I saw a lot of boys wearing plaids and checks in dags. Once the gown was finished we sat down together and looked at how some frocks were trimmed – plain frocks are no fun and my little man isn’t afraid to be EXTRA. He really enjoyed the sash and belt look on a few extants so we went with that using some scrap brown worsted wool I had from another project. We decided to use that same wool for contrast piping and for a sweet little dagged trim on the sleeves. I think it really gives the frock a more masculine feel.
I’m really excited about the finished project and I can hardly wait for the event next month. I definitely think he’s going to be irresistible to photographers.
PS. Enjoy some photos of him in his adorable outfit, I couldn’t resist sharing them.
The Challenge: 1850s linen bodiced petticoat for a child
Notions: Metal hooks and eyes, beeswax, and thread
How historically accurate is it? It’s mostly machine sewn and it seems that cotton was a more popular choice for undergarments in the mid 19th century so I will say its 75% accurate.
Hours to complete: Total was probably less than 4 hours
First worn: Aside from pictures for this post and Instagram last month it hasn’t been officially worn yet
Total cost: $25 for pattern, linen fabric was from the stash


 Not being entirely certain what they were I attempted to mimic the pleated sleeve look with a pair of pleated gauze sleeves which I tacked onto my short shift sleeves.


 Earrings – Check! Watch – Check! I think all that was needed to round out the work was a pretty little portrait miniature of one of my historical boyfriends. Having based my persona partly on the Blennerhasset family which settled in southern Ohio at the end of the 18th century I thought it would only be fitting to have my beau Harman Blennerhasset’s portrait miniature recreated.

 Esther Catherine Landrum was born in Chelthenham, her father the proprietor of the George Inn a well established coaching inn on the road to Bath. Coming from a genteel family she was sent to school in Bristol as a young girl where she became known as an accomplished singer and pianist. She returned home at the age of 17 after the unexpected death of her father. It was then that she begin to receive pressure from her older brother to find a suitor and settle down. After many unsuccessful attempts to marry her off he finally resigned to the fact that as long as the inn was prosperous she would not be a burden.
 Lydia Maria Aldridge Landrum was born in Bristol to a family with no particular fortune and only their name to recommend them. Her father inherited their meager estate and a pittance which allowed them to live in some comfort. Her aunt took pity on their family and agreed to pay for her schooling in Bristol as they could not afford the tuition for both her and her older brother. Upon returning from school she soon made the acquaintance of Thomas Landrum, a schoolmates brother and young officer in the Army. They were wed and soon she was moved to her new home in Chelthenham.


 Since I have my historical sewing kit in order already, I turned to my favorite tool: the Bohin needle, a French company in business since 1833 and manufacturing needles since 1860. In this day and age it can be difficult to find sewing tools and notions that are produced by manufacturers that are focused on quality and not quantity and cheap labor. I love these needles, they glide like through fabric like butter; yes even that tough K&P wool doesn’t stand a chance with these and I gladly pay to have these little fellows shipped to my door from